I got some questions about how I keep my nails and cuticules so neat. So I decided to do this post about nail care.
First of all the cuticles they are very important, because as you all know if they don't look good your nails don't look good.
It is very important to keep them hydrated and exfoliated. So this is what I do once a month: before applying my nail polish I apply around the cuticules a bit of this product:
Blue Cross cuticule remover - it's a product that moistens the dead skin around your cuticles so that, after you can easely remove all that unwanted tissue on your nails. You are supposed to let it sink in for a while and then take an orange stick or the tool of your preference to take out all of the dead tissue hanging in there. You can buy this off of Nailsupplies.us and it must cost about 3$ in the size that I am showing you here.
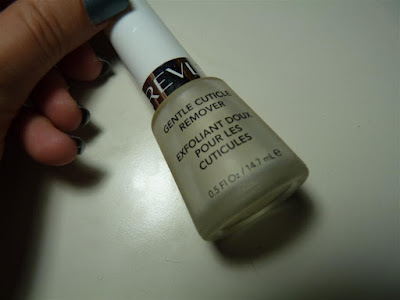
 You can also use this product it is almost the same thing as the blue Cross, but I think it is much more expensive: Revlon cuticle remover
This is the tool that I use:


It's not the perfect tool - it is better to use an orange stick but here they are very expensive. So you either use that and chuck it in the garbage after each use, or you go and buy one of these thing, which have to be cleaned regularly.
After I remove the dead skin I push my cuticles in with the same tool and that's it.
I then clean the excess product with a paper towel and continue with another product that has really done miracles for me. I used to have nails that exfoliated, and that didn't allow me to let my nails grow, because they would get thin and brake very easely, until I discovered this product, made in Romania. If you live in Romania this is sold in pharmacies and costs about 6 RON( which is the equivalent of 2$ or 1.5€). It is a treatment that must be applied every day for a week in the beginning, and you must not apply any nail polish during this week, and after the week is done, you can go about your normal routine with nail polish and everything, but it still has to be used once every 3 days.
 I've never had problems ever since.
After applying this treatement, I apply my base coat - very important - always apply base coat before polish, this prevents staining, and protects the nail. You can even buy a treatement base coat, or a ridge filler if you have uneaven nails.
This is what I am using at the moment: Sephora base coat and you can buy it in any Sephora store for about 6€.

This is when you can finally apply your nail polish, in two coats normally. You can top it off with some top coat, if you want some protection to the polish, so that it can last more, or if you want it to dry faster. I use Seche Vite because it is one of the fast, self leveling top coats. You can buy this on Nailsupplies.us for about 5$.


I love this cream, because it is very soft, and smells like lemons. I also have Burt's Bees Lemon Butter cuticule cream but I don't like it as much, because it is very hard, and thus difficult to use. You can buy this at Monoprix if you live in France.

First of all the cuticles they are very important, because as you all know if they don't look good your nails don't look good.
It is very important to keep them hydrated and exfoliated. So this is what I do once a month: before applying my nail polish I apply around the cuticules a bit of this product:
Blue Cross cuticule remover - it's a product that moistens the dead skin around your cuticles so that, after you can easely remove all that unwanted tissue on your nails. You are supposed to let it sink in for a while and then take an orange stick or the tool of your preference to take out all of the dead tissue hanging in there. You can buy this off of Nailsupplies.us and it must cost about 3$ in the size that I am showing you here.


This is the tool that I use:


It's not the perfect tool - it is better to use an orange stick but here they are very expensive. So you either use that and chuck it in the garbage after each use, or you go and buy one of these thing, which have to be cleaned regularly.
After I remove the dead skin I push my cuticles in with the same tool and that's it.
I then clean the excess product with a paper towel and continue with another product that has really done miracles for me. I used to have nails that exfoliated, and that didn't allow me to let my nails grow, because they would get thin and brake very easely, until I discovered this product, made in Romania. If you live in Romania this is sold in pharmacies and costs about 6 RON( which is the equivalent of 2$ or 1.5€). It is a treatment that must be applied every day for a week in the beginning, and you must not apply any nail polish during this week, and after the week is done, you can go about your normal routine with nail polish and everything, but it still has to be used once every 3 days.

After applying this treatement, I apply my base coat - very important - always apply base coat before polish, this prevents staining, and protects the nail. You can even buy a treatement base coat, or a ridge filler if you have uneaven nails.
This is what I am using at the moment: Sephora base coat and you can buy it in any Sephora store for about 6€.

This is when you can finally apply your nail polish, in two coats normally. You can top it off with some top coat, if you want some protection to the polish, so that it can last more, or if you want it to dry faster. I use Seche Vite because it is one of the fast, self leveling top coats. You can buy this on Nailsupplies.us for about 5$.

At night I like to apply a cuticule cream so that they are moisturised. I currently use Lush - Lemony Flutter. You can buy this at a Lush store it costs about 10€.

From time to time you can also exfoliate your hands. there are several products you can use but for now I will stop here.
I hope this was helpfull. What is your nail care routine?


